

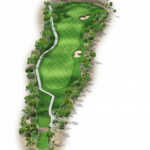
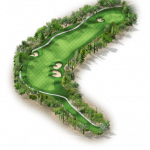
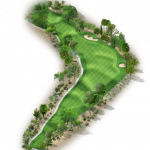
#1 360 Yards – Par 4
A challenging start to the day with a hard dogleg to the right. The bunkers straight away are a good aiming point. An uphill approach shot to the two–tiered green is the best way to score here.

#2 132 Yards – Par 3
A short par 3, but not one to take lightly. This green is surrounded by three deep bunkers. Take note – the green slopes severely right to left. Knock it on and take a crack at birdie!

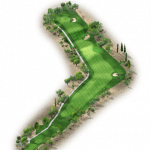
#3 345 Yards – Par 4
This hole plays down away from the mountain. The yardage from here plays short and the approach shot is not easy to hold. If you can gauge the distance correctly, birdies can be had here.
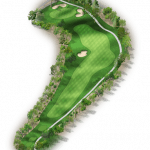
#4 386 Yards – Par 4
The only straight par 4 you will see. This tee shot is quite intimidating, but there is more room than you can see. Great views here hitting back into the Catalina Mountains to an elevated green. Try to avoid the green side bunker, but don’t go too far right on your approach or the big numbers could come your way.
#5 478 Yards – Par 5
This is a great birdie opportunity. The big hitters can reach this small green in two. Otherwise, avoid the left side to leave a clear second shot. Be aware that this is the smallest green on the course and out of bounds lurks everywhere.
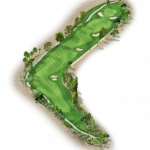
#6 360 Yards – Par 4
A tough dogleg left. The ideal tee shot is right center at about 115 yards. Beware of the fairway bunker left – hitting this split tiered green is difficult enough. But please note the bunkers on the right and behind this undulating green.
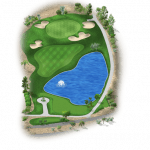
#7 146 Yards, Par 3
This tee shot plays uphill to a green that slopes from back to front. A small pond fronts the putting surface, but is generally not in play. If you can avoid the bunkers in front and behind, this hole can be conquered.
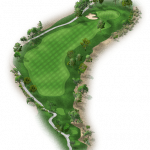
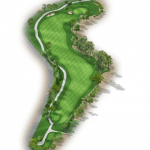
#8 525 Yards – Par 5
A dogleg right, uphill par 5 that will challenge your nerves. It takes two big shots to get home in two but the smart play is to hug the left side of the fairway. Out of bounds, trees, and traps run the entire length of the hole. This green is protected by two deep sand traps, left, and right.

#9 181 Yards – Par 3
One of the better par 3’s in town. An uphill tee shot to a wide but shallow green with water on the left. Try to stay away from the bunkers behind the green – it makes for an intimidating shot.
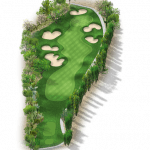
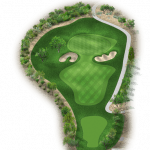
#10 256 Yards – Par 4
A very short par 4, but don’t mark your 3 down yet. You have four fairway bunkers to negotiate with before hitting into a humpbacked green, guarded by three deep green side bunkers.

#11 378 Yards – Par 4
Uphill dogleg right with bunkers guarding the left and right sides of the fairway. A good tee shot will leave you an uphill shot into a two-tiered green that is very difficult to putt.
#12 392 Yards – Par 4
The views are great, but get ready for a difficult little hole. Steer clear of the fairway bunkers on the right and don’t go through the fairway. Your second shot will be from a downhill lie to a green that runs from front to back.

#13 171 Yards – Par 3
A short downhill tee shot to a severely tiered green with three green side bunkers makes for a very fun hole to play – this one is aced more than any other hole here at Skyline!
#14 429 Yards – Par 4
A dogleg right that calls for your tee shot to stay left center to open up to a split tiered green protected by just one green side bunker. Stay away from the right side on the tee shot – trees and out-of-bounds come into play.
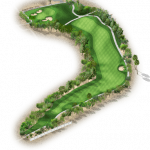
#15 444 Yards – Par 4
A dogleg left that challenges even the big hitters. The fairway is protected by out-of-bounds throughout the entire hole. A good drive will leave you hitting into an elevated green. Par is a good score here.
#16 519 Yards – Par 5
A three shot hole that calls for accuracy more than length. The second shot needs to be played to the left side of the fairway to open up the green. Two green side bunkers protect a two-tiered green.
#17 134 Yards – Par 3
A short tee shot to an elevated green that is protected by two deep green side bunkers. The largest par 3 green that Skyline has to offer leaves some room for mistakes.
#18 502 Yards – Par 5
To play safe or not so safe – trees guard the left and right sides of the fairway with a fairway bunker staring you in the face off the tee box. The second shot should be right center of the fairway for a good approach to a generous green that is protected by three green side bunkers. A great finishing hole!